Short version: the Liquidswap swap app is a non-custodial, on-chain interface for exchanging Aptos-native tokens through automated liquidity pools. You connect a wallet, pick two assets, and the app quotes a route. Nobody holds your funds along the way — which is powerful and unforgiving in equal measure.
How the swap actually works
Unlike a centralized exchange with an order book, a DEX swap prices your trade against a liquidity pool — a smart contract holding a reserve of two tokens, say APT and USDT. When you swap USDT for APT, you add USDT to the pool and remove APT. The pool rebalances using a formula (Liquidswap offers both a classic constant-product curve and a stable curve tuned for assets that should track each other, like two stablecoins).
The important consequence: the bigger the pool relative to your trade, the less the price moves against you. Small pools mean high slippage — the gap between the price you were quoted and the price you actually get. A $50 swap in a deep pool barely moves the needle. The same $50 in a tiny, freshly created pool can cost you several percent.
- You always sign the transaction yourself; the app never moves funds on its own.
- The quote you see is an estimate — it can shift between preview and confirmation.
- Every swap costs a small network (gas) fee, paid in APT, on top of the pool fee.
- Liquidity providers, not the app, earn the pool fee — that is what incentivises people to fund the pools you trade against.
Reading the interface without getting lost
Almost every AMM front-end shares the same anatomy, and Liquidswap is no exception. Learn these five elements once and you can use any DEX:
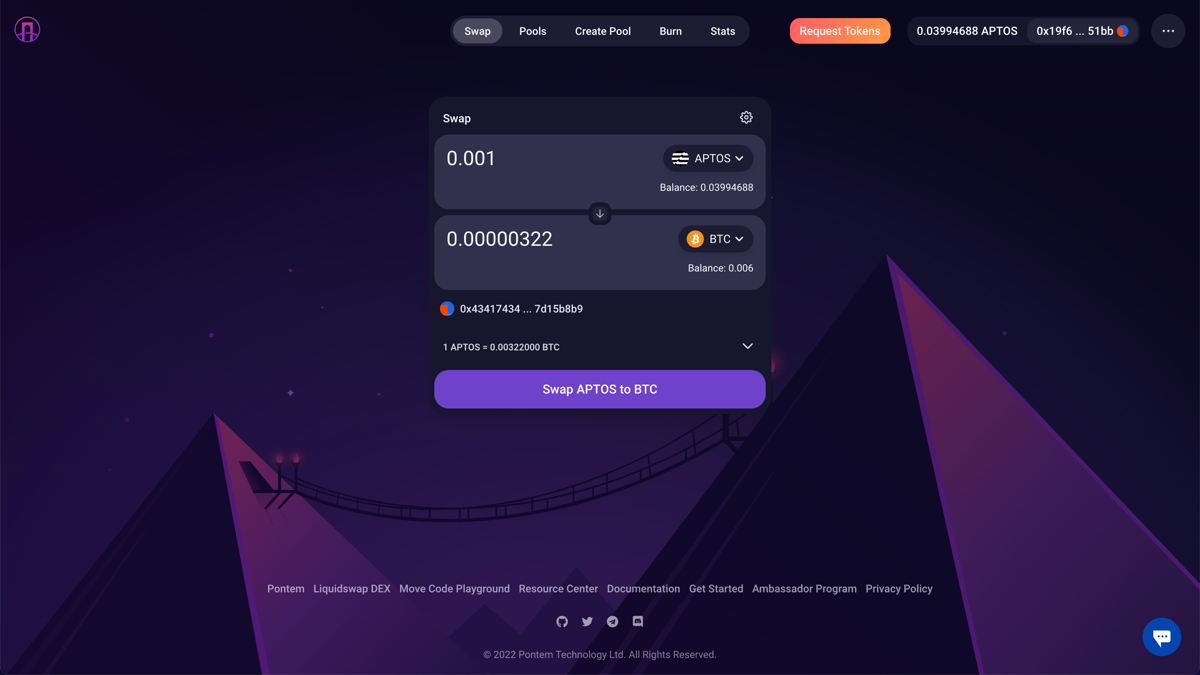
The two token fields
Top field is what you pay ("You send"), bottom is what you receive ("You receive"). Tapping the token badge opens a searchable list. This is the single most dangerous moment for beginners, because anyone can create a token with any name and logo. A fake "USDC" can sit right next to the real one. Never select a token from the list by name alone — verify its contract address (more on that in our token guide).
The rate and the route
The interface shows an estimated rate (e.g. "1 APT ≈ 8.98 USDT") and the route it will take. A direct route swaps in one pool; a multi-hop route bounces through an intermediate token to find a better price. Multi-hop is normal and usually fine, but each hop adds a little fee and a little risk, so on thin pairs a direct route is calmer.
The settings gear
Behind the little gear icon live your slippage tolerance and sometimes a transaction deadline. Leaving slippage at a sane default (0.5%) protects you. Cranking it up to make a stubborn trade go through is exactly how people get sandwiched by bots. We will come back to this.
Volatile pools vs stable pools
One thing that sets Liquidswap apart from a plain textbook AMM is that it offers two different pool types, and picking the right one saves you money:
- Volatile ("uncorrelated") pools use the classic constant-product curve (x·y=k). They suit pairs whose prices move independently — say APT and USDT. The trade-off is more price impact on larger trades.
- Stable pools use a curve tuned for assets that are supposed to trade near each other, like two different stablecoins or a token and its wrapped version. Around the peg, they offer far lower slippage and a lower fee.
You usually don't have to choose manually — the router picks the pool that gives the best output — but understanding the difference explains why swapping two stablecoins is nearly free while swapping into a thin, volatile token can cost a couple of percent. If you ever provide liquidity yourself, choosing the correct pool type is essential.
Fees, in plain numbers
There are two costs on every on-chain swap. Neither is hidden, but both are easy to overlook when you're focused on the token amount.
| Cost | Typical range | Paid to |
|---|---|---|
| Pool / swap fee | ~0.30% (volatile) · ~0.04% (stable)* | Liquidity providers |
| Network gas | ~0.0007 APT (a fraction of a cent)* | Aptos validators |
| Slippage / price impact | 0.1–1%+ (depends on pool depth) | Nobody — it's just the market |
*Fee tiers and gas are indicative and referenced from official Liquidswap and Aptos documentation. Live figures vary with network load and pool configuration — always confirm in the app before you confirm a trade.
Notice that the network gas on Aptos is trivially small. This is the opposite of Ethereum mainnet, where a bad-timing swap can cost more in gas than the trade is worth. On Aptos the number that actually matters is slippage on thin pools, not gas.
Slippage and price impact, decoded
These two terms get muddled, so here is the clean version:
- Price impact is how much your own trade moves the pool price. Big trade in a small pool = big impact. It is shown before you confirm.
- Slippage tolerance is how much worse than the quote you are willing to accept before the transaction auto-cancels. It protects you from the price moving between preview and execution.
If a swap keeps failing and the app suggests raising slippage to 5%, 10% or more, stop. High slippage tolerance is an open invitation to MEV “sandwich” bots that trade just before and after you to skim the difference. A failing trade usually means the pool is too thin for your size — split it up or use a deeper route instead of widening the tolerance.
Getting assets onto Aptos in the first place
A DEX can only swap what already lives on its chain. Before you can trade on Liquidswap, your funds need to be on Aptos — and this is where a huge share of beginner losses actually happen, long before any swap. There are two common routes in:
- From a centralized exchange: buy or already hold APT (or a supported stablecoin), then withdraw it to your Aptos wallet address, making sure you select the Aptos network on the withdrawal screen. Send a small test amount first.
- Via a cross-chain bridge: move an asset from another chain (Ethereum, for example) onto Aptos. Bridges are powerful but add a layer of smart-contract risk and network-selection risk. Use well-known bridges only, and again, test small.
When you withdraw from an exchange to your Aptos wallet, the sending network must be Aptos. Picking the wrong network — a different chain that happens to list the same ticker — can send your funds into the void with no recovery. The receiving address format and the selected network must both be Aptos.
If all of this feels like a lot of moving parts for a single transfer, that's a fair reaction — and it's exactly the scenario where an instant convert route that abstracts the network away can be the safer first step.
Making your first swap safely
Follow this order. The riskiest moment is choosing the token and the network — get those right and the rest is routine.
Use a wallet you control. Confirm you're on the correct site — check the URL character by character — before approving the connection.
Pick what you're sending and receiving. Verify both live on Aptos and match the official contract address. A matching ticker is not proof.
Read the estimated output, the rate and the price impact. Keep slippage at a sane default; tighten it further on thin pools.
Approve in your wallet, then confirm the transaction succeeded on a block explorer before you relax. Start with a small test amount the first time.
If a token you didn't add appears in your wallet, do not interact with it. Malicious “dust” tokens can route approvals that drain funds. When a signature request asks for more than the specific swap in front of you, reject it and close the tab.
Thinking about providing liquidity? Read this first
Swapping is only half of what an AMM does. The pools you trade against are funded by liquidity providers (LPs) who deposit both tokens of a pair and earn a share of the swap fees. It can look like easy yield. It isn't free money, and the reason has a name: impermanent loss.
In plain terms: when the two tokens in your pool drift apart in price, the automated rebalancing leaves you with more of the token that fell and less of the one that rose. Compared with simply holding the two tokens, you can end up worse off — the "loss" only becomes permanent when you withdraw, hence the name. Fees earned can offset it, but on a volatile pair they don't always.
- Stable pools (two assets that track each other) have minimal impermanent loss — that's their appeal for LPs.
- Volatile pools can be far more profitable in fees but carry real impermanent-loss risk. Model it before you deposit.
- Rewards can end. Advertised APRs are often propped up by token emissions that dilute over time. Read whether the yield is real fees or temporary incentives.
Providing liquidity is a genuine strategy, but it is an active one, not a savings account. If you don't yet understand impermanent loss well enough to explain it to a friend, you're not ready to LP with size.
Common mistakes we see people make
- Chasing a brand-new token in a shallow pool. The price impact eats you alive, and the token may be un-sellable minutes later.
- Approving unlimited spend. Where a front-end offers a spend limit, approve only what you need for this trade.
- Trusting a link from a DM or an ad. Bookmark the real site. Search results and paid ads are a favourite home for clones.
- Ignoring the small test transaction. A tiny first swap costs pennies in gas and confirms the whole path works before you commit real size.
The honest verdict
The swap app is excellent at what it's built for: fast, cheap, self-custodial swaps between Aptos tokens. The Aptos base layer makes gas a non-issue, and the choice of stable and volatile pool curves is genuinely useful. It is not the right tool if you need to move value across unrelated chains, cash out to fiat, or make your very first crypto move without a wallet. For those jobs, an instant convert route is simpler and removes the network-mismatch risk entirely.
Bottom line: use Liquidswap when you already live on Aptos and want to move between its tokens. Use a centralized converter for a first move or a cross-asset jump. Neither is "better" — they solve different problems.
Convert between hundreds of coins in a couple of clicks — the network is handled for you, with no seed phrase to manage.